Making a cup of filter coffee should be simple and fuss-free. For many of us, it’s the rite of passage each morning before we start the daily grind (pun intended). Filter coffee is easily accessible as we do not require specialized equipment such as the espresso machine and is very friendly to our wallets. In fact, it would be way cheaper to brew a cuppa at home than to purchase that cup of Geisha filter you are enticed to try at your nearest specialty coffee shop.
Without going into much coffee theory, I recommend this simple brew recipe which you can use on any coffee beans you have at home. The equipment needed are cost-friendly and can be easily found at home, or you could purchase this home brew kit from Foreword’s online shop.

Equipment:
– Hario V60 dripper + filter paper
– Gooseneck kettle / kettle or measuring cup with a spout
– Weighing scale (highly recommended)
– Coffee grinder (optional)
– Timer (optional)
Ingredients:
– 16g of coffee beans
– 240g of hot water
We chose the V60 dripper as it is easily found in many specialty coffee shops. If a $8-9 price tag is too hefty for you, Daiso offers a substitute at only $2! We highly recommend having a weighing scale as the simple act of measuring the amount of coffee and water by weight can significantly help you to elevate your coffee experience. A coffee grinder is ideal but can also be optional as many specialty coffee shops offer grinding services for free.
Preparation
1. Start by placing the V60 dripper on top of a beaker or a cup.
2. Take the filter paper and fold along its seam.
3. Put the filter paper into the V60 dripper.
4. With some hot water, rinse the filter paper.

Rinsing the filter paper serves 3 purposes: it allows the filter paper to stick to the sides of the dripper so it does not move around, it pre-heats the equipment so that your coffee does not cool down too quickly during brewing, and it helps remove any paper taste that might be imparted to your coffee during the brewing process. Discard the water collected in the beaker and your set up is ready to go.
5. Weigh 16g of coffee and grind the coffee beans.
I use the Commandante hand grinder and I find 23 clicks does the trick for me. If you are using a Hario hand grinder, the filter grind comes around 7 to 9 clicks. If you are ordering from a specialty coffee shop, inform them that you like a filter grind for the V60 dripper.

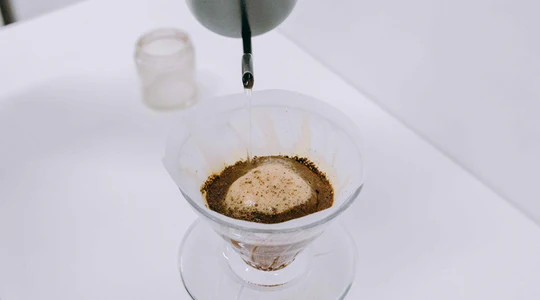
6. With your equipment set up for brewing (V60 dripper placed on top of a beaker / cup which is on top of a weighing scale), pour the grounded coffee into the V60 dripper.
7. Tare the weighing scale to zero.
8. Prepare hot water into your gooseneck kettle.
9. Start the timer when you start pouring the hot water into the coffee grounds.

Brewing
1. Pour up to 30 – 32g for your first pour, within 30 seconds.
2. Next, pour up to 100g, always making sure you cover as much coffee grounds as possible.
3. Then, pour up to 180g.
4. Finally, pour to 240g. The total brew time should be 2.30 – 3.30 mins.

Pro-tips and After-thoughts
If you are wondering why we chose 16g of coffee and 240g of water, this is because it translates to a brew ratio of 1:15 (read as “one is to fifteen”). The brew ratio tells us the amount of coffee and water to be used and is a term which coffee brewers use to communicate recipe. If you find the resultant coffee too diluted to taste, then increase the amount of coffee or reduce the amount of water.
In my personal experience, you might want to play with a “looser” brew ratio of 1:16 or 1:17 when brewing a lightly roasted coffee with complex flavours. A “tighter” brew ratio of 1:12 or 1:13 works better for darker roasts or when you want to pack a punch into your cuppa. In Singapore, because we are so used to the strength of our local kopi, a typical filter coffee from a specialty coffee shop may taste “bland” to many. People mistakenly relate coffee strength to its quality, which are very different measures.
Experiment with your coffee – brew it once with a looser brew ratio and once with a tighter brew ratio. Which is better tasting for that coffee? Can you generalize this to all coffees?

In many brew guides, time is considered a variable. In practice, however, we don’t control time as a variable, but we measure time as an indicator of the resultant coffee’s quality. Generally, a longer brew time means more extraction took place (hence we expect more bitterness), while a shorter brew time means less extraction (hence we expect more acidity). The grind size of the coffee directly determines the total brew time, although other factors such as coffee freshness and agitation also play their part.
Water temperature plays an important role in extraction. In general, the hotter the water, the more extraction will take place. As a guide, any hot water from your water dispensers would be sufficient to brew your coffee. Cafes generally have either a kettle with thermostat or a water dispenser with specific temperatures. In my office, I use the hot water from the water dispenser.
Lastly, to end off the ritual, the vessel in which you serve your coffee also makes a difference! Personally, I prefer having my filter coffee served in a pot with a small cup for me to pour in. The pot of coffee will be kept hot longer while the small cup allows for the coffee to be cooled down quickly for tasting. Paper cup never does the trick; psychologically it seems to impart a papery taste to my coffee.
What would you like for us to write next? DM us on Instagram or Facebook!
Till next time, enjoy your coffee


